As what Sitecore always owe to offer – a platform that excites marketing and developers experience by providing a new level of convenient released version. Introducing —Sitecore 9.
I’m excited to explore this new released version but, before anything else, we must install first the application and it’s requirements.
Here’s a guide on how I’ve installed Sitecore 9 using SIF which is commonly referred to as Sitecore Install Framework.
SIF is a framework that lets you define Tasks and Parameters inside a PowerShell framework.
Note/ Assumptions:
Before proceeding to this installation, make sure that your solr instance is installed as service and can be accessed via Https protocol –https://sitecoreazuremvc.wordpress.com/2017/11/10/solr-ssl-certificate-generation-and-installation-guide/
Installation was done seamlessly on a machine with Windows 10 Enterprise Edition that has OS Version 1703.
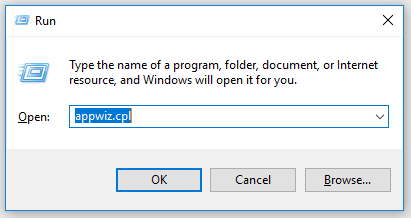
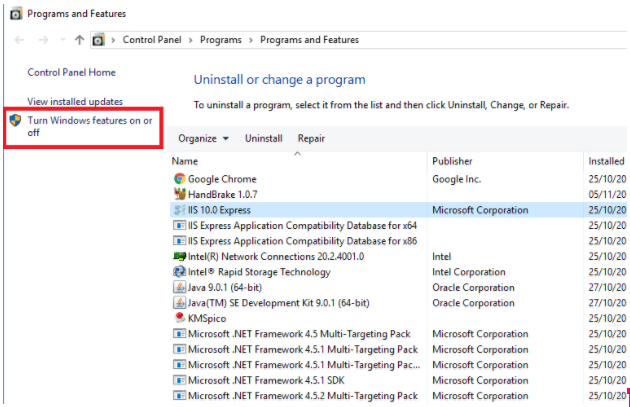
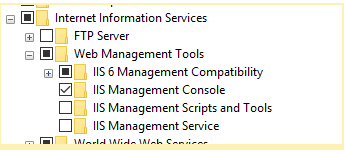
Before installation, if you are using WINDOWS 10 CREATORS EDITION VERSION 1709 since it has IIS 10 and your might get error 500.19 which will halt installation. Please refer images for the settings on your machine.
- Type appwiz.cpl on run dialogue
2. Click turn windows feature on or off
3. And follow this below on your IIS installation and click “OK”
INSTALLATION:
- Download these following files here: https://dev.sitecore.net/Downloads/Sitecore_Experience_Platform/90/Sitecore_Experience_Platform_90_Initial_Release.aspx
- Under Download options for On Premises deployment
- PACKAGES FOR XP SINGLE (IDEAL FOR DEV ENVIRONMENT)
- Then create a new folder and name it SC9install files or whatever name you may find suited and extract the contents of that zip file you will be having 3 files extracted at first.
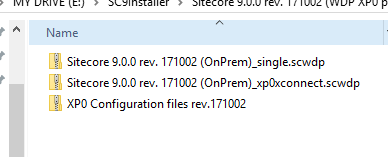
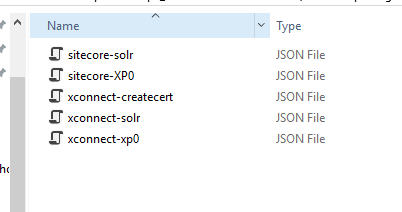
Now after these files are extracted out, extract the XPO Configuration Files Rev.171002 on the same folder where these files belong. This zip file contains the json files necessary for installation.
So in summary, here is how your folder will look like all in all
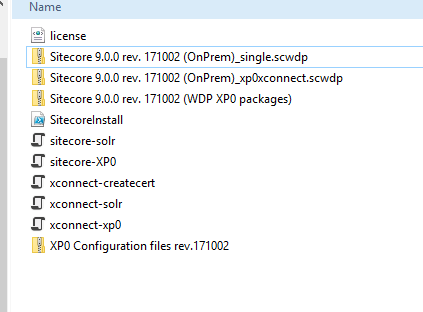
Don’t forget to drop your latest Sitecore license file on that same folder. It will be needed by the PSM FILE later on.
- Open your PowerShell
- To install SIF PowerShell modules run the following commands on your PowerShell window.
Register-PSRepository -Name SitecoreGallery -SourceLocation https://sitecore.myget.org/F/sc-powershell/api/v2
Install-Module SitecoreFundamentals
Import-Module SitecoreFundamentals
Import-Module SitecoreInstallFramework
- To check if it is successful, we can see the available modules by typing this command to the PowerShell window: get-module -ListAvailable and check if this exist
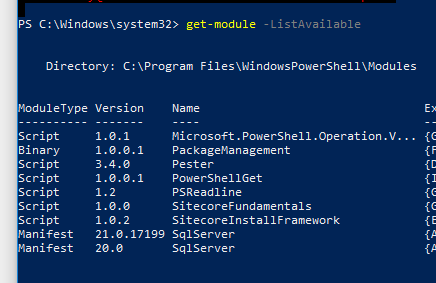
If you see the Sitecore fundamentals and Sitecore Install Framework is there then it’s all good. We can now proceed to running the script.
Here is the PowerShell script please make a ps1 or a psm1 file for this:
#define parameters
$prefix = “sc90”
$PSScriptRoot = “C:\Sitecore\Install\Sitecore 9.0.0 rev. 171002” – this is the folder where all your files where in ex: sc9Installer
$XConnectCollectionService = “$prefix.xconnect”
$sitecoreSiteName = “$prefix.local”
$SolrUrl = “https://localhost:8983/solr” – the https version of your solr
$SolrRoot = “C:\solr-6.6.2” – folder of your solr files
$SolrService = “solr662” – name of your solr service
$SqlServer = “localhost” – database server
$SqlAdminUser = “sc90” – commonly the “sa” account in some
$SqlAdminPassword = “password” – database password
#install client certificate for xconnect
$certParams =
@{
Path = “$PSScriptRoot\xconnect-createcert.json”
CertificateName = “$prefix.xconnect_client”
}
Install-SitecoreConfiguration @certParams -Verbose
#install solr cores for xdb
$solrParams =
@{
Path = “$PSScriptRoot\xconnect-solr.json”
SolrUrl = $SolrUrl
SolrRoot = $SolrRoot
SolrService = $SolrService
CorePrefix = $prefix
}
Install-SitecoreConfiguration @solrParams -Verbose
#deploy xconnect instance
$xconnectParams =
@{
Path = “$PSScriptRoot\xconnect-xp0.json”
Package = “$PSScriptRoot\Sitecore 9.0.0 rev. 171002 (OnPrem)_xp0xconnect.scwdp.zip”
LicenseFile = “$PSScriptRoot\license.xml”
Sitename = $XConnectCollectionService
XConnectCert = $certParams.CertificateName
SqlDbPrefix = $prefix
SqlServer = $SqlServer
SqlAdminUser = $SqlAdminUser
SqlAdminPassword = $SqlAdminPassword
SolrCorePrefix = $prefix
SolrURL = $SolrUrl
}
Install-SitecoreConfiguration @xconnectParams -Verbose
#install solr cores for sitecore
$solrParams =
@{
Path = “$PSScriptRoot\sitecore-solr.json”
SolrUrl = $SolrUrl
SolrRoot = $SolrRoot
SolrService = $SolrService
CorePrefix = $prefix
}
Install-SitecoreConfiguration @solrParams -Verbose
#install sitecore instance
$sitecoreParams =
@{
Path = “$PSScriptRoot\sitecore-XP0.json”
Package = “$PSScriptRoot\Sitecore 9.0.0 rev. 171002 (OnPrem)_single.scwdp.zip”
LicenseFile = “$PSScriptRoot\license.xml”
SqlDbPrefix = $prefix
SqlServer = $SqlServer
SqlAdminUser = $SqlAdminUser
SqlAdminPassword = $SqlAdminPassword
SolrCorePrefix = $prefix
SolrUrl = $SolrUrl
XConnectCert = $certParams.CertificateName
Sitename = $sitecoreSiteName
XConnectCollectionService = “https://$XConnectCollectionService”
}
Install-SitecoreConfiguration @sitecoreParams -Verbose
And all you need to do is run this powershell script and the Installer framework will do the job for you automatically if everything goes well you will be able to access your sitecore instance through the sitecoreSiteName variable that you set above.
That’s it! You’ve got Sitecore 9. Have yourself explore and be amaze on the things it has offered to you.

Leave a comment