This article is a complete easy-to-follow guide to successfully install Sitecore Commerce 9.0.3. Included website links as reference for prerequisites and file downloads that would be needed on the installation.
These experience for Sitecore Experience Commerce 9 Update 3 (Sitecore XC 9.0.3) installation may vary in different machines especially on duration of the completion of the installation. An estimated complete installation with no errors or bug fixes would approximately take at most 2 hours depending also on computer speed.
Prerequisites:
- Windows 10
- Already running instance of Sitecore Experience Platform 9.0 Update 2 .
- Sitecore Experience Accelerator 1.8.0 (Note: must login to https://dev.sitecore.net/ before downloading)
- Sitecore Powershell Extensions 4.7.2 (choose the option for sitecore 8/9)
- .NET Core SDK 2.0.0
- .NET Core Windows Server Hosting 2.0.0
- Note: you may get Sitecore Commerce APIs 500 error , so I recommend to upgrade into .NET Core Windows Server Hosting 2.0.8
Before starting the installation of Sitecore Commerce 9 Update 3, make sure to have the following additional prerequisites already installed and running on your machine:
- IIS version 10.0
- .Net Framework 4.7.1
- SQL Server 2016 SP2, SQL Server 2017. SQL Server 2014 is compatible with the XM Scaled topology.
- Solr 6.6.2 and installed as a service on your machine, here is a guide how to install it conveniently.
- Sitecore Install Framework 1.2.1. For more information about installing SIF, how to get multiple instances of SIF and switching between them if necessary, here is a guide by Koen Heye
To make sure all commands of Sitecore installed framework executes properly, the prerequisite for the Sitecore Install Framework are:
- Web Deploy 3.6
- URL Rewrite Module 2.1
- SQL Server PowerShell Module
- SQL ODBC Drivers
- SQL sqlcmd Utility
- SQL Server CLR Types (x86 and x64)
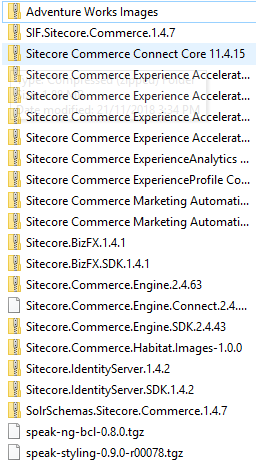
Files Needed:
This will be the only package file you will need to get the installation going.
- Packages for On Premise 2018.12-2.4.63 (Note: must log into https://dev.sitecore.net/ before downloading)
- This package contains 22 .zip and some .tgz files that you will need for the installation.
Instructions:
- Install .NET Core SDK 2.0.0 and .NET Core Windows Server Hosting 2.0.0 .
- Rebuild the Link Databases for the core and master databases if you haven’t
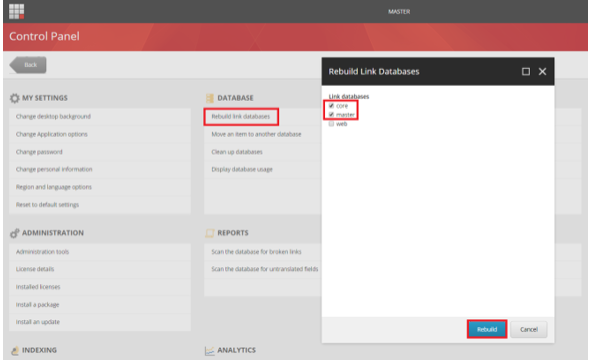
-
- On the Sitecore Launchpad, click Control Panel, and in the Database section click Rebuild Link Database
- Select the master and core databases and click Rebuild.
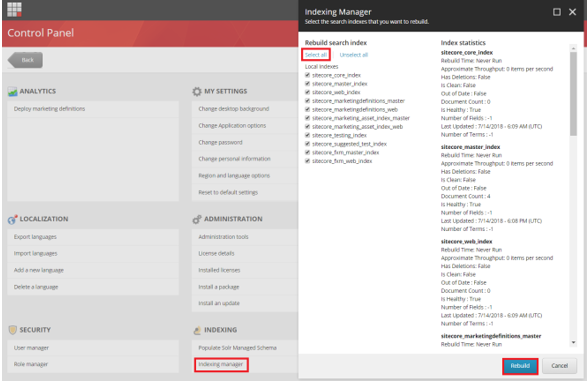
3. Rebuild search indexes if you haven’t
-
- On the Sitecore Launchpad , click Control Panel, and in the Indexing section, click Indexing Manager.
- In the Indexing manager dialog box click Select all and then click Rebuild.
4. DO NOT stop the xConnect Site for your sitecore instance
- From the sitecore installation guide(Page 10)

5. Create a new folder D:\sc903_com_install or anywhere you want to create your installation folder.
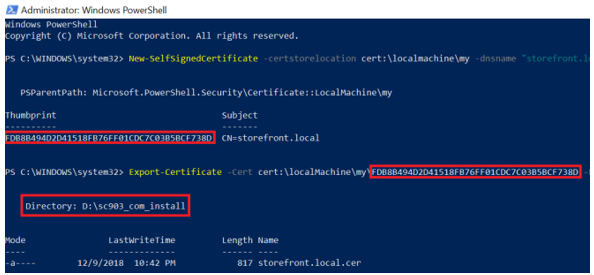
6. Create a certificate for the Sitecore Commerce Engine Connect to authenticate with the Sitecore XC Engine:
- Launch Powershell as administrator
- Create the certificate by running the following command
- New-SelfSignedCertificate -certstorelocation cert:\localmachine\my -dnsname “storefront.local”
- Export the certificate to a file by running the following command
- Export-Certificate -Cert cert:\localMachine\my\ -FilePath D:\sc903_com_install\storefront.local.cer
7. Download MSBuild Microsoft Visual Studio Web targets (available from Nuget) then extract the Web targets package, copy the \tools\VSToolsPath\Web\Microsoft.Web.XmlTransform.dll file into D:\sc903_com_install.
8. Download Sitecore Experience Accelerator 1.8.0 for Sitecore 9.0 and put it into D:\sc903_com_install.
9. Download Sitecore Powershell Extensions 4.7.2 then put it into D:\sc903_com_install.
10. Download and unzip Packages for On Premise 2018.12-2.4.63 then put it into D:\sc903_com_install.
11. Unzip D:\sc903_com_install\SIF.Sitecore.Commerce.1.4.7.zip and then rename D:\sc903_com_install\SIF.Sitecore.Commerce.1.4.7 to D:\sc9_com_install\SIF for a better practice.
12. Unzip the D:\sc903_com_install\Sitecore.BizFX.1.4.1.zip.
13. Unzip the D:\sc903_com_install\Sitecore.Commerce.Engine.SDK.2.4.43.zip file then copy the D:\sc903_com_install\Sitecore.Commerce.Engine.SDK.2.4.43\Sitecore.Commerce.Engine.DB.dacpac file into D:\sc903_com_install.
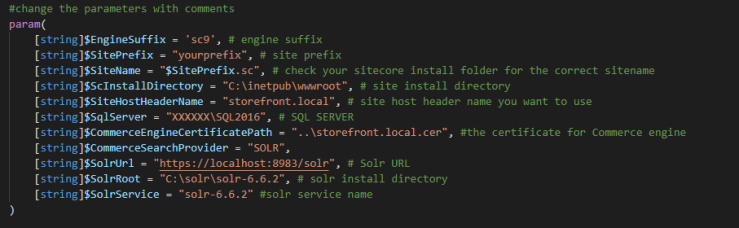
14. Download sc903_com_install.ps1 and put it into D:\sc903_com_install\SIF then open it and change the following parameters:
NOTE: You can also modify the included file Deploy-Sitecore-Commerce if you want a more personalized installation script.
15. If you are using SIF 2.0.0 open D:\sc903_com_install\SIF\Configuration\Commerce\Solr\sitecore-commerce-solr.json to change the Name attribute to name in order to make it work properly

16. (Optional): you can specify any local account (Note: it will be created automatically if non-existent) to be set up for the various application pools that are created part of the deployment at line 77-78

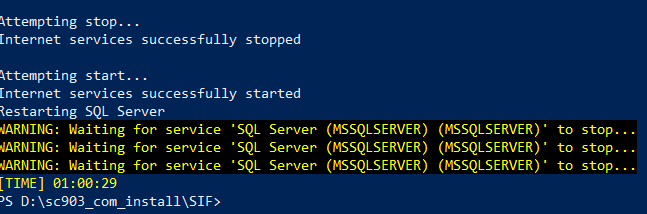
17. Install it by executing the script .\sc903_com_install or whatever filename you saved the script with.

Hopefully nothing will stop the installation process.
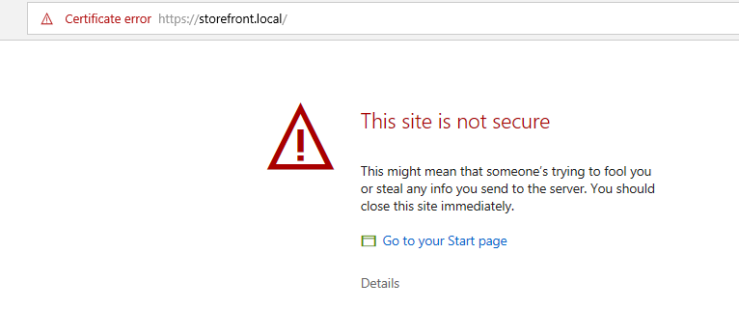
- Open a browser then navigate to storefront.local/, you would see the default page of Sitecore website. That’s because we don’t use the default host name sxa.storefront.com so we need to correct it inside Sitecore.
- log into yoursitename/sitecore/
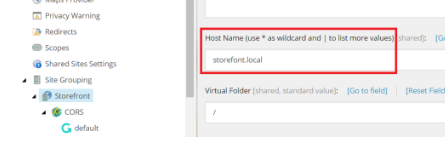
- access /sitecore/content/Sitecore/Storefront/Settings/Site Grouping/Storefront
- update Host Name to storefront.local and then publish it
- Refresh storefront.local/, you would see something like this

Some known issues encountered during the installation
Added here some known issues encountered during the process and provided resolutions on how to fix those issues (This might help if ever you’ll encounter the same issue).
- Missing parameter: name

-
- Follow step 15 on the instruction guide.
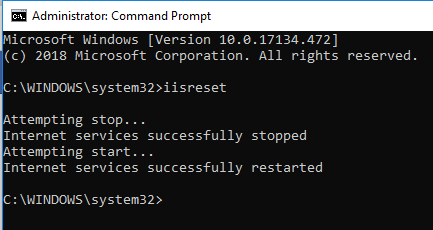
- The service cannot accept control messages at this time
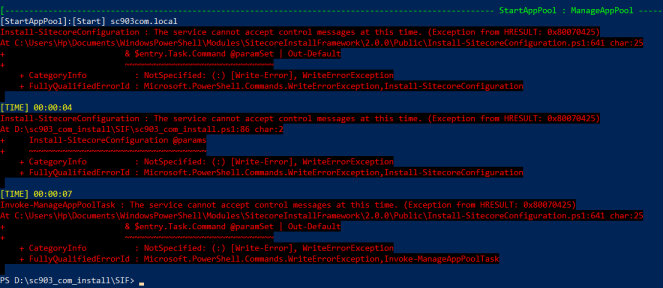
-
- Access your IIS and check if the Application Pool for you website is running or at a stop, if it is somehow on stop status start it back up.
- If your app pool and website is running and you get this error from the get go open a command prompt in administrator mode and do and iisreset.
- Site is not secure
-
-
- This is caused by your certificate not being in the trusted root certificate.
- Open IIS and check what certificate your site is using.
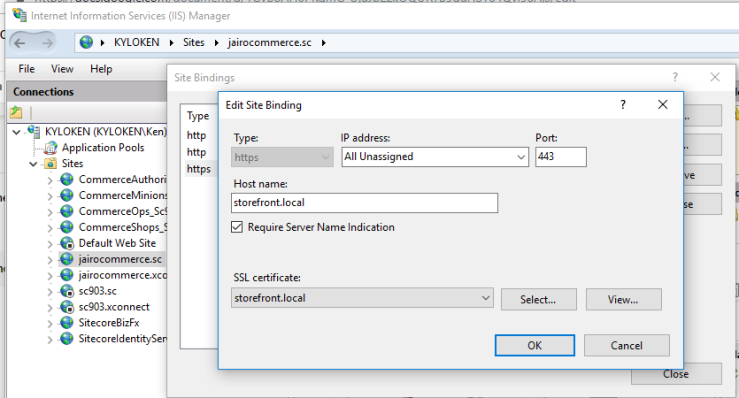
- Search that certificate on your install folder, it is the certificate that you exported following step 6 of this installation guide.
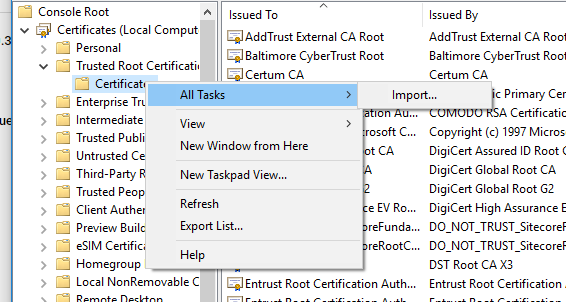
- Open MMC add the snap in for Certificates and use the Computer Account
- Expand and go to Trusted root Certificates
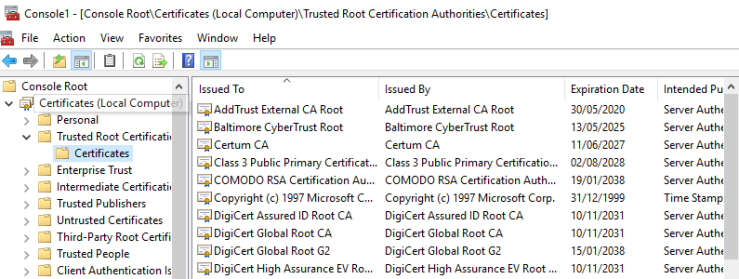
- Right click and select All task and Import
-
-
- Then locate and import the certificate on your install folder.
- Reset your IIS
- And refresh your storefront.local/ you should be able to see your Storefront website.
Resources:
https://dev.sitecore.net/downloads
https://sitecore.stackexchange.com/

Leave a comment