Welcome to my blog!
This a walkthrough on how I integrate Jenkins with Habitat.
Bear with me as we go through this short tutorial.
Jenkins is a software application that allows continuous integration.
Continuous Integration is a development practice that requires developers to integrate code into a shared repository at regular intervals. The concept that meant to remove the problem of finding the later occurrence of issues in the build lifecycle.
A step-by-step guide on how I integrate Jenkins with Habitat.
Here are the steps to follow:
- Before Integrating with Jenkins we have to Configure our Sitecore Website to have different web configurations via TRANSFORM files.
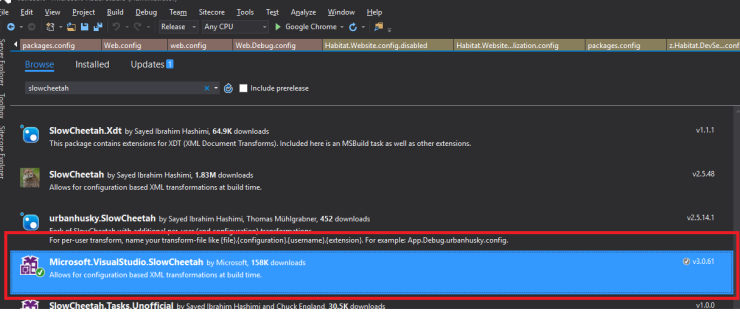
- To make Transform Files in your Visual studio right click your project.cs file → then go to Manage Packages and on the browse section search for SlowCheetah, Slow Cheetah allows us to make configuration files the easy way. If you find it just install.
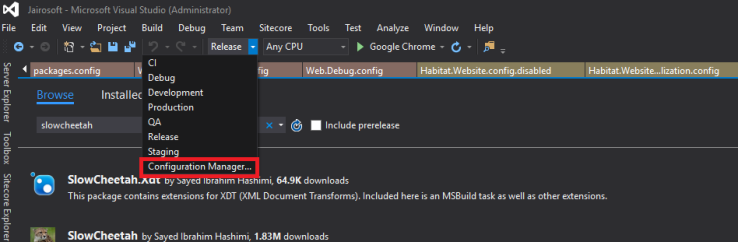
- Now normally visual studio only gives out Debug and release as a config file together with your solution. So we need to make our own custom configuration. To make our Own Custom configuration. On the section above your workspace that says DEBUG click the dropdown arrow and select Configuration manager.
- After that you will be routed to a configuration page or pop up that looks like this
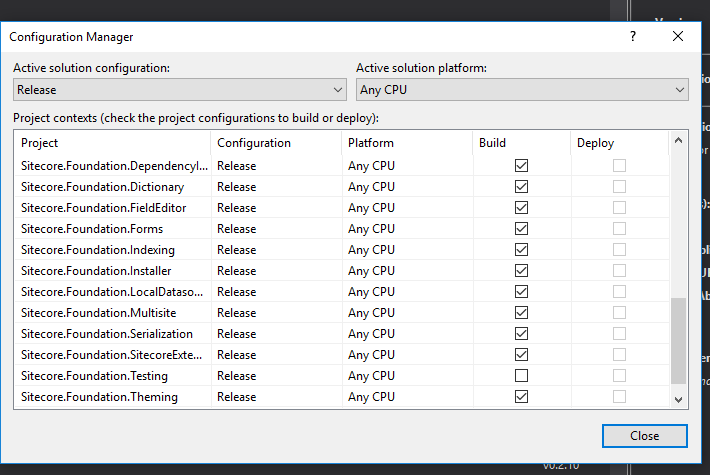 On the active configuration select the drop down and click New. And put a name for the Configuration file. These are the information needed by the slowcheetah to create the transform file for your web.config and other custom config files.
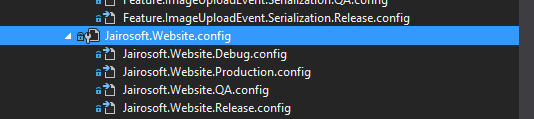
- Just click Ok And when you select let’s say for example you created QA make sure that all projects will be bound to the QA configuration such as what you can see in the image below.
 If you plan to have several other configuration just follow steps 1 to 4 to mak additional configurations.
 - Now, since we already have our build configuration created let’s modify our project web configuration before we add transform files.
- So in your current configuration, set some variables for those data or configuration changes you want to transform when you build a certain environment(use a build configuration that you make). In this case, I just added a variable for the configuration that I’m going to use for several parts in the node of the configuration.

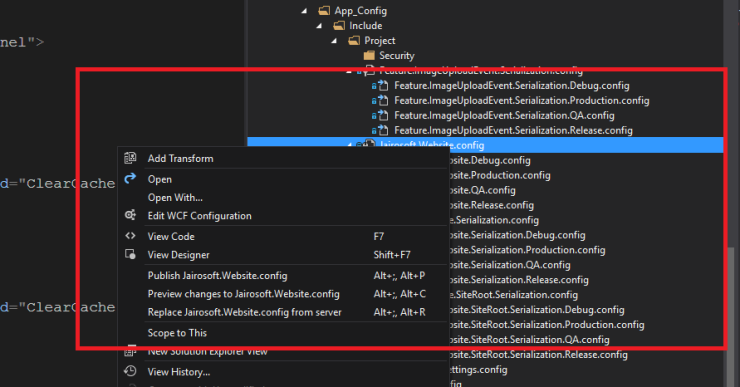
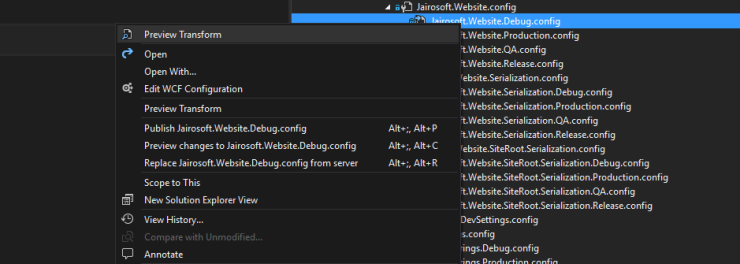
- So after we do this, we create a transform file. All you need to do is right click the configuration and click Add Transform.
 This will add the transform file for each of the existing config in your project or solution. In this case, I added QA and production to the already existing Debug and release.
- Inside the configuration, is where the magic happens, so in here i decided i want to change the rootHostname and the mongo restore, so at this point we want to copy the variables we made earlier and put them in the respected configuration that we want it to be in like so :
 This will just transform the file. It will not replace what is in it, advisable for multiple sitecore instance.
 - To check the result if the replaced values are correct, just right click on the transform configuration you have created and click preview transform
 and then you will see a comparison when it will be transform after the build.
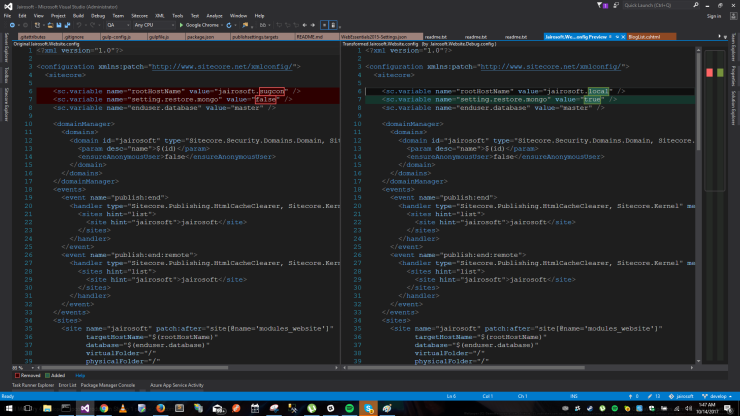 This will let you review what part of the configuration you are going to transform.
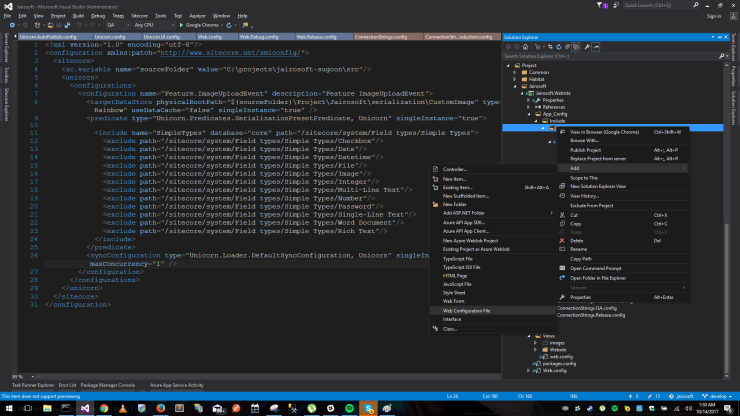
 - Now since we may have a lot of instances, of course we need to also add ConnectionStrings configuration to our project.To do this, we need to go to App_config → include → projectand the right click on the project folder and a web configuration file and name it ConnectionStrings it will automatically add the .config suffix after.

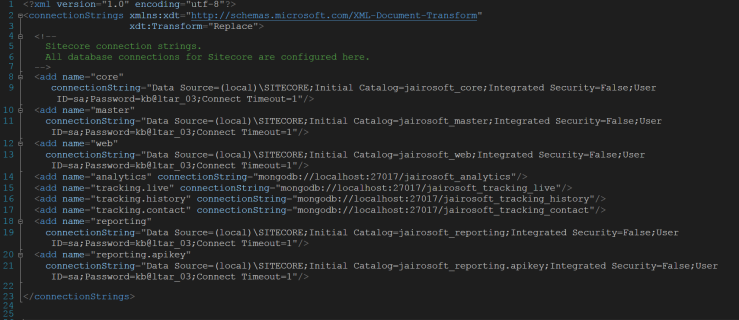
- Inside the configuration that you made for Connection string, put this code below.
 This one is a dummy code but you can put here the connection string found on a certain instance in your inetpub folder C:\inetpub\wwwroot select an instance and just copy the connection string inside the node.
 - Now make a transform file follow step number 7 for that and put this on specific transform file: NOTE THAT THE CONNECTION STRINGS WILL BE DIFFERENT IN EACH ENVIRONMENT(SITECORE INSTANCE) YOU WANT TO BUILD TO.
 The replace transform command there will replace the value inside to the actual connection string found in your inetpub directory or whichever instance you are going to use it. This is some of the basics if ever you have serialization configuration you should also have it configured as such.
 - Since we will be running the build via the Gulp file we need to also modify the existing gulp configuration a little bit. We just have to add a switch statement and a build identifier for each of the configuration we want to do a build for. Just follow the code or logic posted on this link below you can download and inspect the code, this allows you to switch between build environment. Download Link: https://drive.google.com/file/d/0B6h4vzqxWNeYOVA1SnZsMDhfb2c/view?usp=sharing
JENKINS INTEGRATION
-
- Now since we have our necessary files and configuration, we will now create a Jenkins build project that will make use of these configurations.
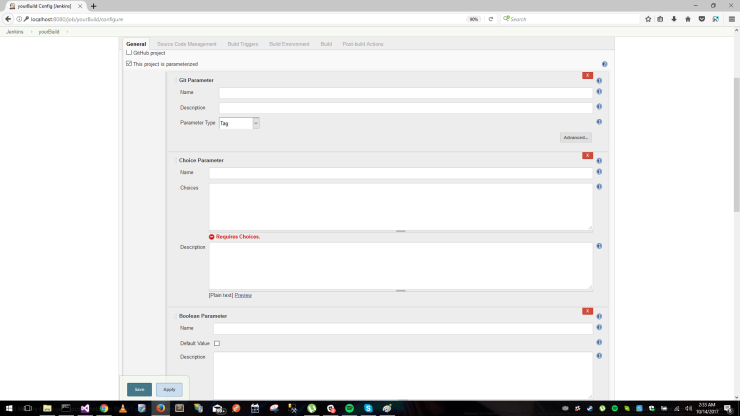
- Before we begin, Sign in to your Jenkins and download the following plug-ins that we will be using for our build project: Git Parameter, Conditional Step. Just go to Manage Jenkins → and click Manage Plugins.
 Under the available tab just search for the plugins mentioned above and download.
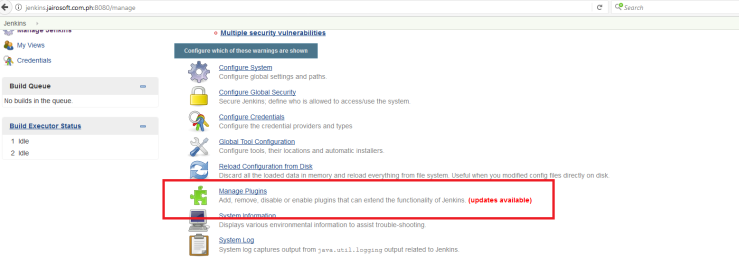
-
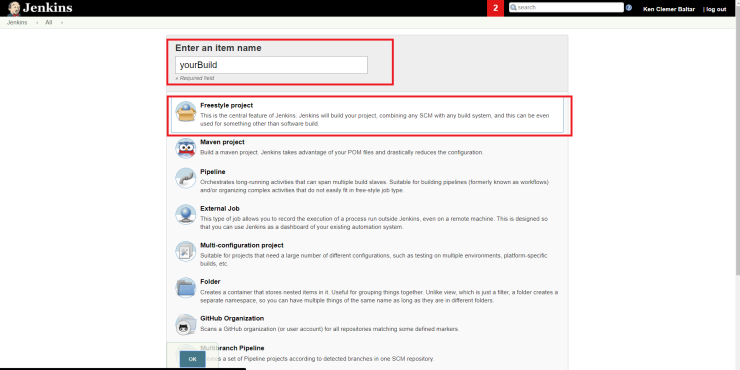
- Sign in to Jenkins on your local machine and select new Item and then fill up the parts that says Enter a name, select Freestyle Project and click Ok.
-
- After you click OK, you will go to your job form where you will build.
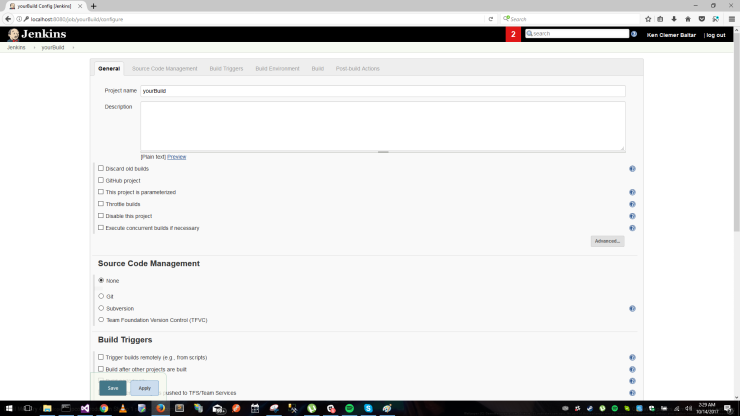
- First thing is we need to make this a parameterized build and select the type of parameterized build that we need like what is seen on the image below.
- After you click OK, you will go to your job form where you will build.
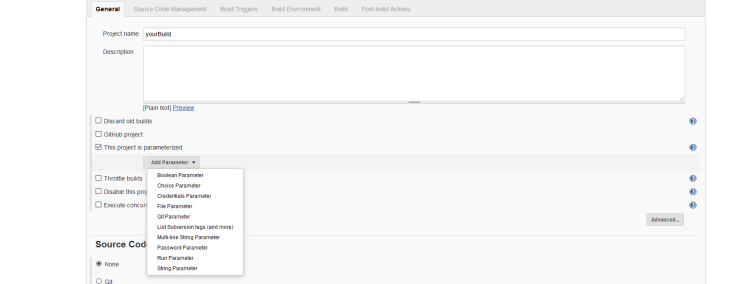
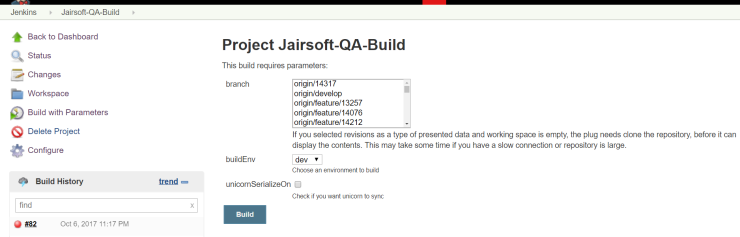
Select the Git parameter,Choice Parameter, Boolean Parameter.-
- Git parameter will allow you to choose which branch in your Git repository to build (since we are using TFS-GIT). This plug-in will look like this when you use it.
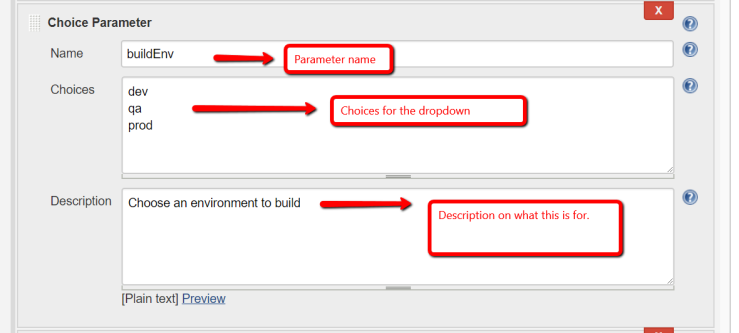
- The choice parameters allows you to have drop down. Here is how to configure it.
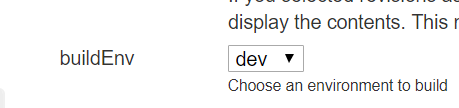
 And this is how it looks like when it is being used.
- Next will be the boolean parameter configuration description will be as follows:
 and it will look like this when used.

- Next is we have to set up the git repository what we will use for the Git parameter and also this will be used to check out the branch that we want to build. To set this up, we will go to source control section and toggle the git radio button.

- Next part is we will now create the build step for the build project, just go to the build Section and Add a build step in this we will need the Execute windows Batch command and the conditional step plug-in.
 So, your build section will look like this.

- Conditional buildstep is used to evaluate the value on the boolean parameter we created before. Here are the description on each section of the conditional step plug-in.
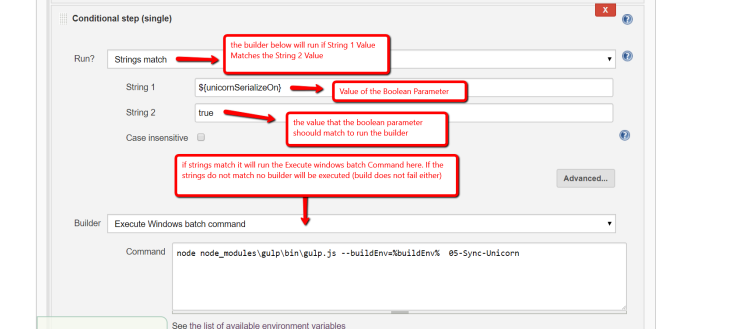
- Since we will be running via gulp and also we are using the windows batch command because we are running the build on a windows machine we type the following code node node_modules\gulp\bin\gulp.js –buildEnv=%buildEnv% 05-Sync-Unicorn this code is equivalent to gulp –buildEnv=QA 05-Sync-Unicorn which will run the unicorn sync gulp task depending on the values set by the qa build environment on your solution, the code is used if node_modules is present on your solution.
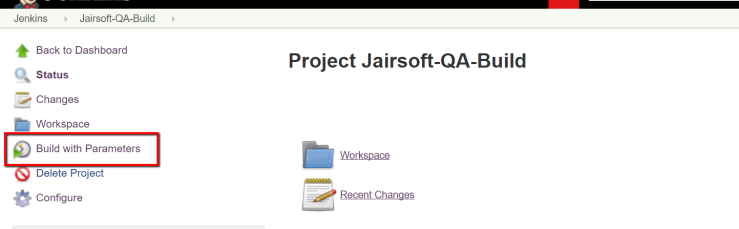
- Now if everything is already set you can click and Save and it will take you to your Jenkins job to build it. All you need to do is build with parameters and select appropriate values for each parameters you want to build it from and click on the BUILD button.
Happy Building!
-

Leave a comment